Creativity with bluebells

woodland

I have spent much of the last two weeks out and about in our local landscape capturing images of bluebells.  Nearly 50% of the world’s bluebells (Hyacinthoides non-scripta) grow in the UK. Every Spring, for about two weeks, ancient woodlands are carpeted in nodding azure bells. If the Japanese go out in droves to appreciate cherry blossom, we Brits do the same for bluebells.

woodland

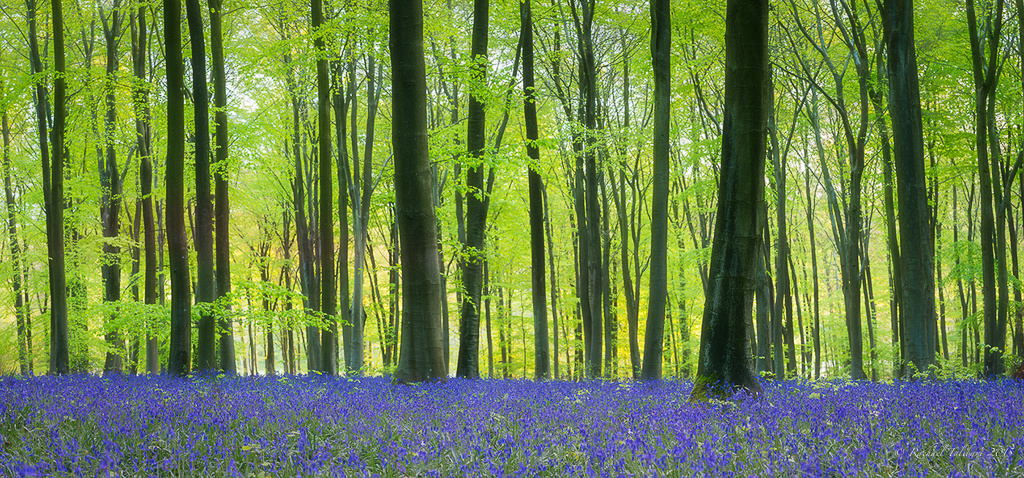
Of course, they are irresistible to the landscape photographer.  But capturing pleasing photos of bluebells is harder than you might think.  The temptation is to go wide, to capture all the majesty of the forest, but this tends to exaggerate the distance between the flowers, minimising the profusion that attracted your eye in the first place. So a longer focal length, that compresses distance, is often the better solution.

woodland

Finding a strong composition can be challenging.  Paths, the more winding the better, create shapes that led the eye into and through the frame.

woodland

Colour balance is also tricky. I often see comments on-line that either praise or criticise bluebell pictures for the way they reproduce the colour of the flowers: ‘nice to see proper blues” is typical.  But bluebells actually look different depending on the light.

woodland

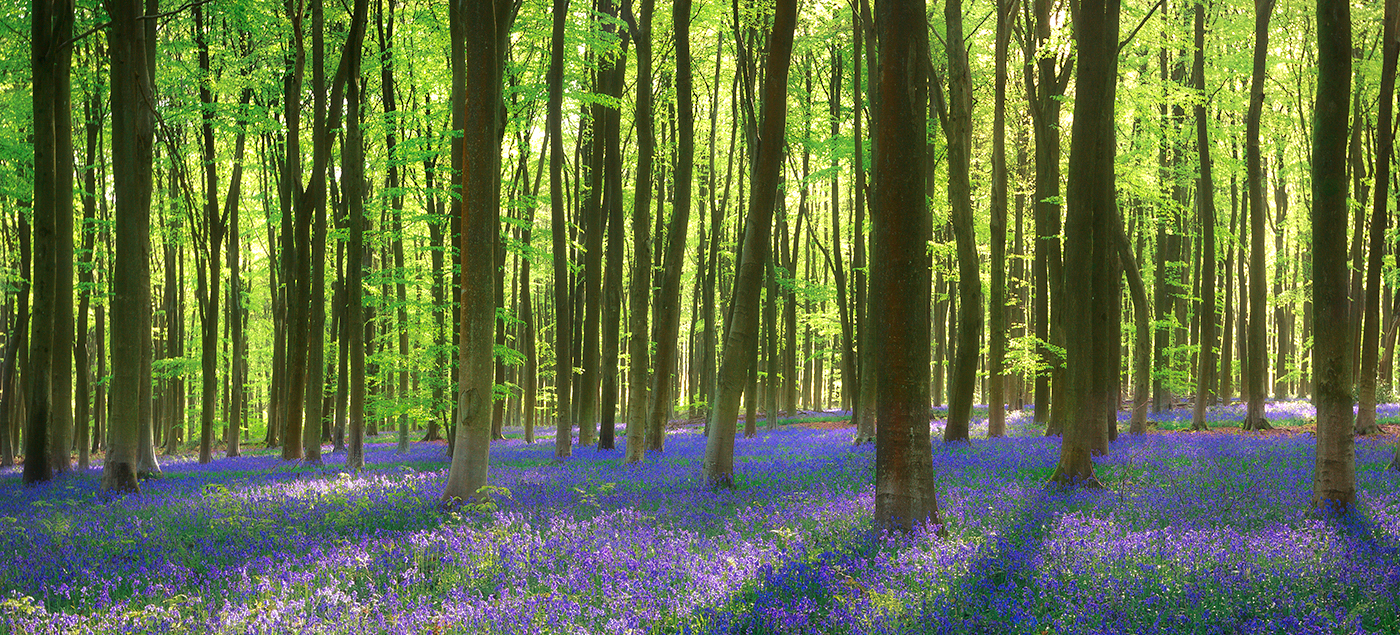
In sunlight or at certain times of day (golden hour, for example) they take on a mauve/magenta tint. Pre-dawn or in shade, they appear more blue.  Equally, the fresh spring leaves of the trees under which the bluebells grow, especially beech, have a strong, almost acid-green colour, that can look over-done to people who have never properly looked at the real thing.

woodland

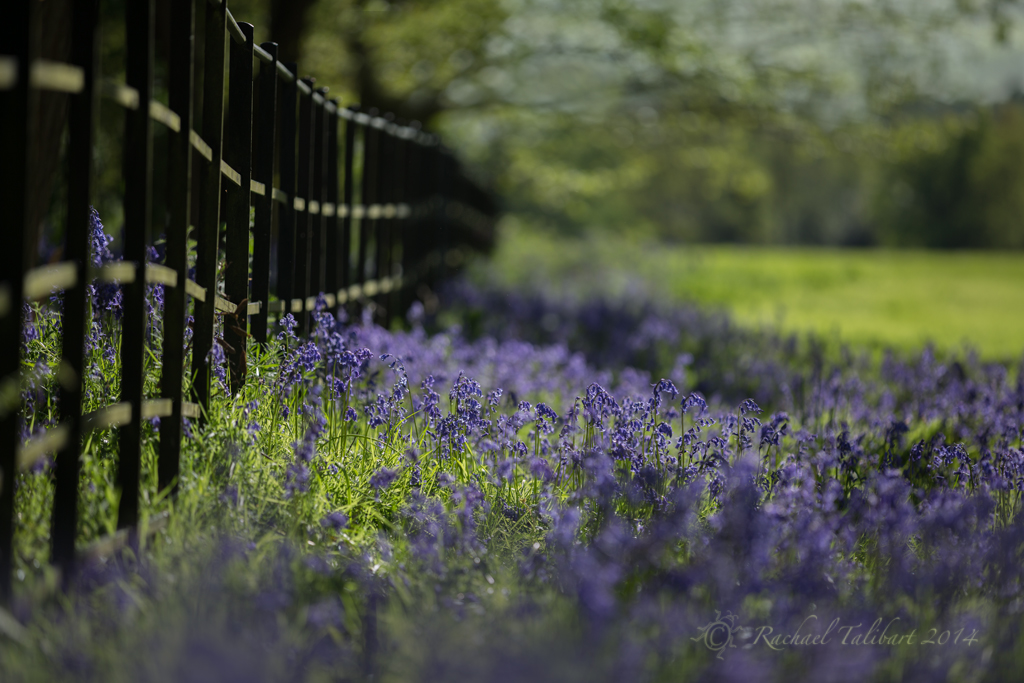
It’s always a good idea to try different apertures.  Landscapers tend to favour narrow apertures to achieve ‘front-to-back’ sharpness.  But, sometimes, using a wide aperture to narrow your depth of field can provide a more pleasing image, just picking out a detail and allowing the rest of the scene to become a blur.

wildflowers

Speaking of blur, on breezy days it’s worth experimenting with shutter speed to capture some movement in the flowers or the leaves of the trees.

woodland

In a wide view, it creates a subtle. dreamy feel.  Closer up, more abstract images can be made.

tree

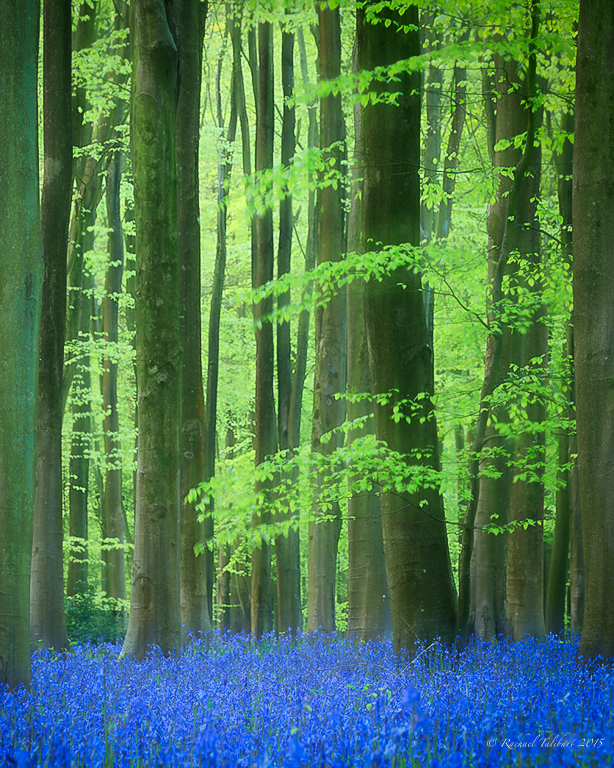
There are other ways to record movement. Intentional camera movement, or “ICM”, is very on-trend at the moment.  Put simply, the camera is moved while the shutter is open.  The result, when it works, is a painterly, semi-abstract rendering of the subject.  The technique suits woodland because it tends to simplify, which can be helpful in cluttered forest scenes.

hammond's copse

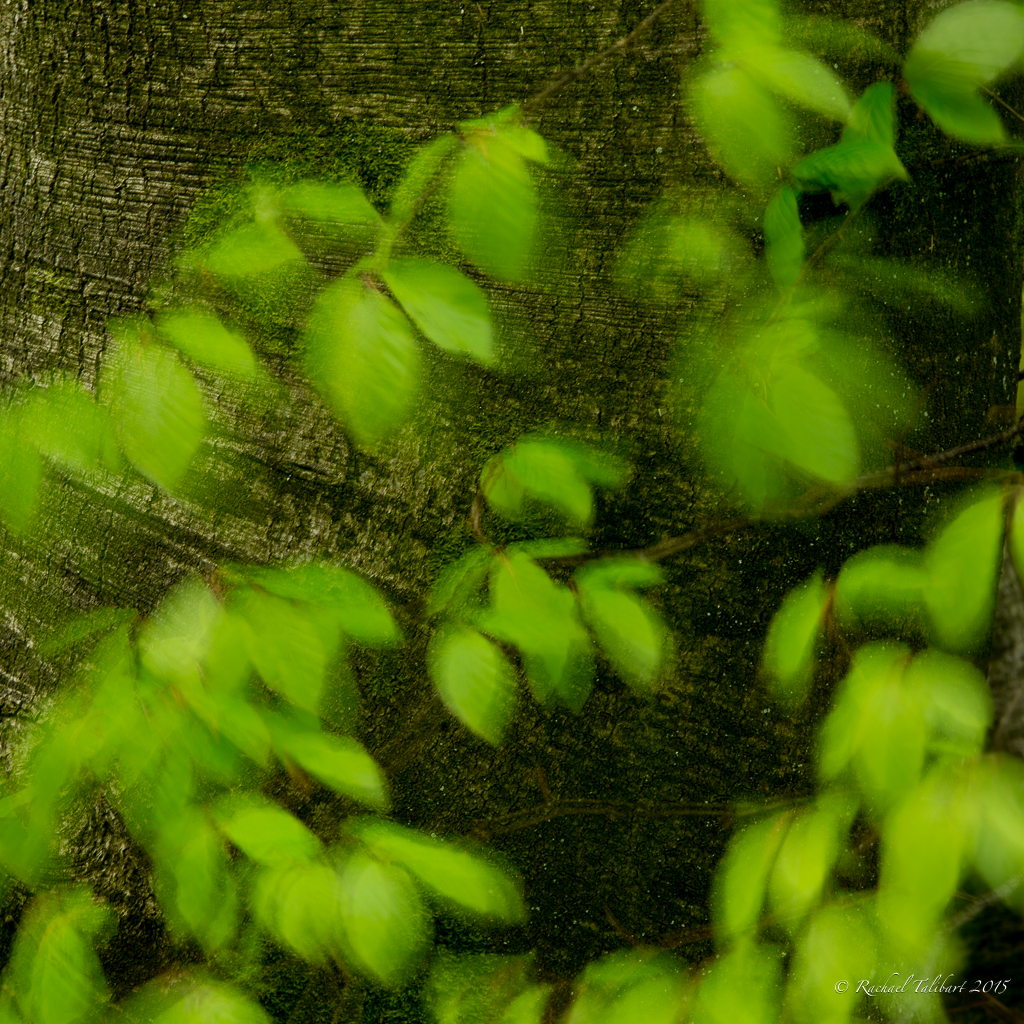
One must be prepared for a lot of out-takes when using ICM, but it’s all fun and in the spirit of experimentation. I find that it helps to choose scenes where there are bold shapes, like tree trunks, to give your image structure.  Without them, ICM images can become a formless jumble.  I also like images where there are still some recognisable details within the blur, as in these extracts from the above image, where an oak leaf can be recognised…

bluebells ICM-3

… and, below, where the frill from a single bloom emerges (bottom right) from the blue haze.

bluebells ICM-2

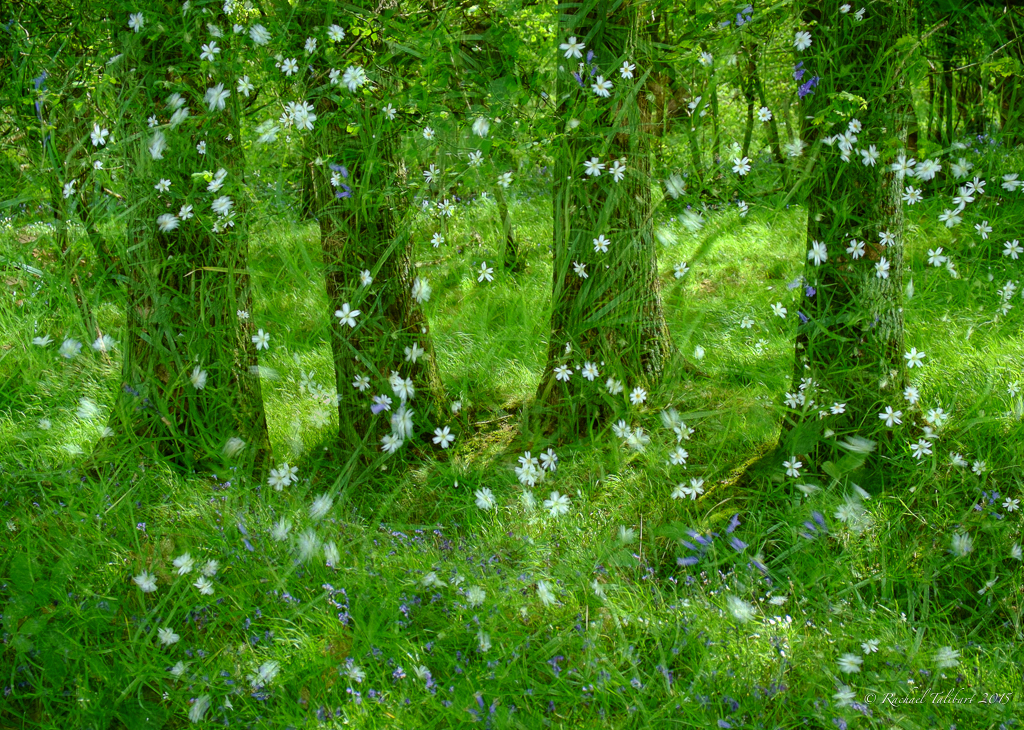
Equally in vogue, making multiple-exposures in-camera can have unexpected and pleasing results. Many modern digital cameras make this simple.  I used my Fuji X-E1 for the shot below. The image on which you are going to superimpose a second shot is shown in live view under the picture you are now taking, enabling you to visualise exactly what you are going to achieve. This image features stitchwort, tiny white flowers I found growing among the bluebells at a local copse on Tuesday.

wild flowers

Bluebell season is mostly over now, but it will surely return to delight us all again next Spring.  I think it’s lovely that the Japanese have a word for their national cherry-blossom gazing, ‘hanami’.  Perhaps we need to invent one for bluebells.  Any suggestions?

Fun with sea and filters

The good folk at Wex Photographic have asked me to write a post about how I use filters to achieve different shutter speeds using images from my recent trip to Brittany. Regular readers may remember I did a piece about this last month and promised a second instalment, so this is it. Today, I will talk a little more about the equipment I use. Almost every image in this post was taken using my Canon 5D mark iii and Canon’s 16-35mm f2.8 L lens, a Manfrotto tripod and ball head, and timer remote switch RST-7002 (the only exception is the one from Norfolk, where I used Canon’s 70-200mm f2.8 IS lens).

1/60, f/9, 35mm, ISO 200, 2-stop hard ND grad, circ. polariser.

1/60, f/9, 35mm, ISO 200, 2-stop hard ND grad, circ. polariser.

The first few images in this post were taken on the same occasion, with the same composition, only a few minutes, or even seconds apart. They show the effect of different shutter speeds on breaking waves. The light was very dynamic that evening, with the sun going in and out of patchy clouds, so I had to adapt my ISO and aperture to achieve the shutter speeds I wanted without constantly having to change filters.

1/4, f/11, 35mm, ISO 200, 2-stop hard ND grad, 6-stop 'Little Stopper', circ. polariser.

1/4, f/11, 35mm, ISO 200, 2-stop hard ND grad, 6-stop ‘Little Stopper’, circ. polariser.

I use the LEE 100mm wide-angle filter system. As you can see from the image captions, most of these shots were taken using the 0.6 (2-stop) hard ND (neutral density) graduated filter. This enabled me to balance the exposure by darkening the sky, thus bringing out the foreground that for a lot of the time was in shadow. I have noticed on my workshops that people tend to be anxious about using a hard grad for fear that the line between dark and light will be too obvious. However, on the standard hard grad the transition still has a small band of gradation, allowing for a little ‘wiggle room’ in its placing, and I use this grad for 90% of my landscape work. When shooting in woodland, however, I tend to use my 0.9 (3-stop) soft grad.

Brittany

0.3″, f/13, ISO 100, 35mm, 2-stop hard ND grad, 6-stop ‘Little Stopper’, circ. polariser.

To lengthen the exposure time for the whole image (i.e. without gradation), I have three go-to ND filters, the 10-stop ‘Big Stopper”, the 6-stop “Little Stopper” and a 3-stop “pro-glass”. Lee introduced the Little Stopper last year and I find that I now use it for most of my long exposure work, only using its bigger brother for very long exposures or very bright conditions.

Brittany

1.3″, f/13, 35mm, ISO 100, 2-stop hard ND grad, 6-stop ‘Little Stopper’, circ. polariser.

A third, but invaluable, filter is the circular polariser. Strangely, despite all the advancements in digital imaging and developing, I don’t think it is yet possible fully to replicate the effect of a polariser in post-production. It can be used to boost colours, reduce or boost reflections and define a blue sky. (It also adds up to two stops to your exposure time.) The visual impact is strongest when used at right angles to the sun but it can still have an effect at other angles. However, a polariser should be used with caution on a very wide angled lens when it can add a patchy look to the sky. The Lee polariser sits in front of the filters on a special ring adapted to screw onto the filter holder. Be sure, if you are going to use it on a wide lens, to buy the ultra slim polariser. Lee only introduced it recently. When I first invested in the system, I made the mistake of buying their standard 105mm only to find it vignetted horribly on my wide lens, forcing me to invest the same money all over again in Heliopan’s ultra slim equivalent.

Perros-Guirec (wex 5)

20″, f/16, 35mm, ISO 50, 2-stop hard ND grad, 10-stop ‘Big Stopper’, circ. polariser.

As you can see from the images, even quite small adjustments in shutter speed affect the appearance of moving water. I like speeds of between 1/5 and 0.8″ as they introduce a pleasing sense of movement without smoothing the water completely. I find 1/5, or thereabouts, is particularly good for catching the way water seems to scatter and fragment in clashes or peaks of waves, as in the shot below, taken on a different occasion, on the Norfolk coast.

1/5, f/8, ISO 50, 123mm, 3-stop "pro-glass".

1/5, f/8, ISO 50, 123mm, 3-stop ‘pro-glass’.

Not every shot has to be a long exposure, of course. In the image below, I liked the effect of the sunset light on the water and wanted to capture more texture.

Brittany

1/50, f/3.5, ISO 400, 22mm. 2-stop hard grad.

However, sometimes the serenity of a longer exposure is more pleasing, as in the image below, taken during a subtle dawn at the same location the next day.

Brittany

101″, f/16, ISO 100, 23mm, 2-stop ND hard grad and ‘Little Stopper’.

If you are thinking of investing in some filters, Wex are kindly offering readers of this blog a discount. Details as follows:

10% off LEE Filters
Start Date: 17/03/2015
End Date: 17/04/2015
Code: SC10LF
Link: http://www.wexphotographic.com/square-or-rectangular-filters-lee-filters/b3073-m144.
T&Cs: http://www.wexphotographic.com/?/popups/terms-promo-leefilters-17032015.html

Drive, reboot

light trails

365/3

Today’s image is from this day two years ago.  We were driving back from an lovely few days in Dartmouth and I was playing with the Sony NEX 7 which I had hired for the trip.  I reviewed the camera here; it remains one of my most-viewed posts.  I was thinking of buying a compact system camera and the Sony was on the shortlist.  It was a powerful little camera, and I enjoyed using it.  However, I actually ended up buying the Fuji X-E1 because I preferred its dials and buttons rather than the more menu-based operation of the Sony.

In other news, I am pleased to be supporting Guildford Green Belt Group with my images. Here’s the New Years card they sent to their supporters:

Wisley AIrfield

Three Farms Meadows

f11 Workshops

I can finally explain why Focused Moments has been so quiet lately.  It’s been a long time in the planning but this week my business partner, Tony Antoniou, and I launched our new venture, f11 Workshops.

Papercourt Lock

We are going to be leading photography workshops and tours in Surrey and West Sussex. The photographer is spoilt for choice when it comes to workshops in some of the UK’s more famous beauty spots, like the Jurassic Coast in Dorset, the Lake District, or the Scottish Highlands, but there are few tours elsewhere.  Yet there are rewarding locations everywhere if you know where to look.  I am really looking forward to introducing other photographers to some of my favourite local places.

Dell Quay

Taking small groups of 6-8 maximum, we aim to tread lightly in our chosen locations, leaving nothing behind and taking nothing away but our photographs and some great memories.

Moonrise over Weybridge

I’ll be blogging about our tours as they happen.  Plus, now that the business is up and running, I should be able to get back to regular posting, and reading.  In the meantime, if you have time, please visit our website.  I’d love to know what you think.  We are also on Facebook and Twitter.


Hampton, floods and a big stopper

Molesey Riverside

ISO 50, 16mm, f/11, 215secs


I found an hour this afternoon to take some pictures of the now-thankfully-receding floodwater at Hampton using my 10-stop ND filter. I expect the novelty of the ‘big stopper’ will wear off eventually but, for now, what fun! As for the floods, the Thames is definitely considerably lower today, but we had heavy rain again this evening…
Hampton Court

ISO 50, 16mm, f/11, 246 secs


I was amused when a young woman came up behind me and asked if she could take a picture with her iPhone ‘through’ my camera. What would you have said?

Shooting stars

Western Australia


One last night sky shot from our trip to Western Australia.  On the two nights I managed to get out with my camera at Smiths Beach, Yallingup, meteors showed up in almost every shot.  Very exciting!  Can you see my husband, up on the dune?

I knew there would be a chance of seeing the milky way during our visit.  Having never tried this sort of photography before, I read up on techniques before we went.  The following is what I read as adjusted by my experiences in the field. But remember, I am very much a beginner at this sort of photography!

For best viewing of the milky way, you need a location as far away from other light sources as possible.  So, away from settlements and roads, and on a night with as little moon as possible.  Luckily, our stay in Yallingup coincided with a relatively late moonrise.  On the first night, it rose two and a half hours after sunset, and later on the second.  That did mean I had to work quickly, as it is best to leave at least a two hour gap after sunset to be sure of a dark sky.  In the image above, the greenish light entering from the left is the moon still below the horizon but beginning to make its presence known.

I had read that a 30 second exposure was best as anything longer and the earth’s rotation would make the stars start to streak.  Although I stuck to this advice, now that I have seen my images on the big screen at home, I think that 20 seconds would have been better; there are signs of movement in my skies.

In order to get as much light as possible to the sensor, I used f2.8, the widest aperture my 16-35mm lens can achieve.  Depth of field is not a major issue at 16mm!  Of course, the very dark conditions that make the milky way visible also make high ISOs necessary.  I used 1600 or 3200.  As I mentioned in my last post, this introduces quite a bit of noise.  I am working on refining my editing to mitigate the noise (many thanks to those who have recommended noise reduction plugins – I will try them all!).  

Focusing is tricky in the dark too.  I had read that focusing to infinity was best but I found in practice it was better just a notch less than infinity.  Perhaps a quirk of my lens.  If you want to focus on something closer, like the pinnacles in my first star shot (reproduced below), then a torch shone on the object is invaluable.  Incidentally, I used my iPhone’s torch app to illuminate the pinnacles.  Otherwise, they would have been silhouettes.

Western Australia


Perhaps the trickiest thing of all is finding your way in the dark with a heavy backpack and tripod.  It was fairly easy on the beach but at Pinnacles it was a little bit daunting, walking out into the desert with no lights or signs to guide you if you lost your bearings.  My husband was worried about driving the car on the dirt and sand track so we left it in the car park.  Probably a mistake with hindsight!  Note to self: next time hire a 4X4.

One final note, I understand that the best time to view the milky way is during winter (so May-August in Australia).  I am going to make that my excuse for not seeing and capturing something like the winning image in Astronomy Photographer of the Year!   Inspirational stuff. 

River of stars

Western Australia

I was lucky, during this trip to Western Australia, to have three opportunities to shoot the night sky.  This shot was taken at Smiths Beach bear Yallingup, in the South Western part of the state.  Out shooting the sunset a day earlier I noticed a small river running into the sand and hoped it might reflect the stars later.  By the next evening, the river had nearly dried up, but there was just enough water left to create some reflections.

One of the problems I have encountered shooting starscapes is that you have to bump up the ISO.  This is because any exposure of longer than 30 seconds begins to record the movement of the stars.  Of course, higher ISOs mean more noise.  It’s not so much of an issue in the sky as it’s already speckled with stars, although even there it can start to look messy.  It shows up more in the foreground, especially the sand in this shot.  Here I have applied some noise reduction in ACR, more for the foreground and a little in the sky,  but at the cost of some of the definition in the stars.  It’s a difficult balancing act that will take me a while to master.  I suspect I need to investigate some of the noise reduction plugins.

One more astrophotography post tomorrow, with full details of technique.

Still Autumn, just…

Weybridge

f/11, 1/25, ISO 100, 16mm, circ. polariser

There is a heavy hint of change in the air.  The trees no longer bask in full Autumn glory. Instead, their leaves billow under the wheels of passing vehicles.  Twice this week my day has begun with scraping frost from car windows.  Staying out to photograph the sunset, my hands and feet became numb from the cold.

Weybridge

f/11, 1/15, ISO100, 16mm, circ. polariser

Perhaps in sympathy, it’s been all change in my digital life this week.  I have finally downloaded Photoshop Creative Cloud and Lightroom 5.  For photographers there’s a special subscription deal for just under £9 a month.  That’s a huge discount, but hurry, it ends on 2nd December. It will take me a while to get to grips with Lightroom as I haven’t used it before but PS CC seems fairly intuitive, not too much of a leap from CS4.

One of the things that’s much improved from CS4 is the HDR facility.  The image below is my first attempt.  Just three exposures blended by PS CC.  It’s certainly light years ahead of what CS4 would have produced but I’m still not sure about it.  I had to tweak a lot to get it to look even vaguely natural.  Perhaps it’s a good thing I have ordered some ND graduated filters so I can do it in camera instead!

Weybridge

f/16, 1/6, ISO 100, 16mm, circ. polariser

Just to make life even harder, I also upgraded my iMac operating system from Snow Leopard to Mavericks.  It seems mostly familiar but for some inexplicable reason I now have to scroll in the opposite direction.  Mighty confusing!  There’s probably a setting I need to tick somewhere.  (Scratches head bemusedly.)  

And, just to add to it all, I have finally given up on Redbubble and am working on creating a new website with Photium.  More on that soon.  In the meantime, I hope you enjoy these further images from my walk last week along the Wey Navigation towpath.

Coulson’s weir

Weybridge


What a stunning day we had today.  The light this morning was so clear; how could I resist?  This is Coulson’s Weir on the Wey Navigation in Weybridge, Surrey.  Continuing the theme of this week, there is also a tiny starburst on the lip of the falls.  Can you see it?  If you saw Monday’s post, you know what aperture I used for this shot. 😉

Starburst – no filter required

River Thames I have recently posted a few shots where the sun looks rather like a star. A few people have asked me what filter I have used, either on camera or in processing, so I thought I’d take a post to explain a simple piece of aperture know-how. The sunburst/starburst effect is simply what you get when shooting small points of bright light using f16. No processing, or special filters required.
London It works with man-made light as well as the sun. Look at this detail from the London night scape. All the lights have that ‘twinkle’. And, yes, the photograph was taken at f16.
night scape
The exact appearance of the burst will vary from lens to lens. My 16-35mm does a particularly nice job, but even the cheapest of kit lenses will do. The London shot was taken in 2009 using the 18-55mm kit lens that came with my very first digital camera, a Canon 400D, and the shot of the Statue of Liberty below was taken using my Fuji X-E1’s kit lens.
USA
Sometimes you can achieve this effect with wider apertures, f14 or even f11 but, to be sure of it, stop that aperture down to f16 or smaller. It only works really well with small points of light. The trick, if you want to achieve this effect with the sun, is to capture it partly eclipsed by an object, the horizon or, as here (taken using yet another lens, my 24-105mm), a tree.
starburst