Adding a bokeh background

Hoverfly in flight

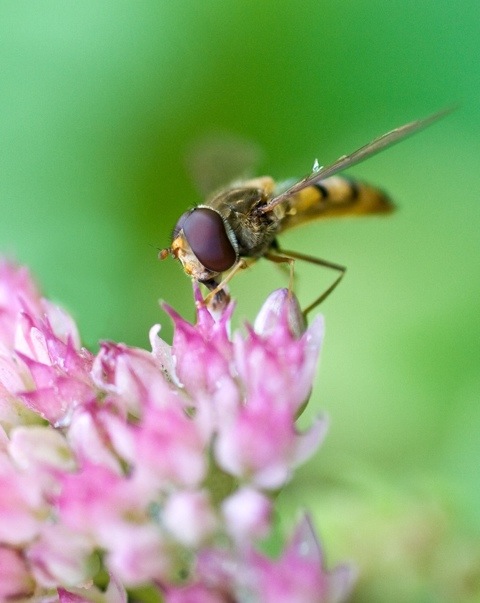
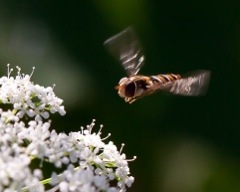
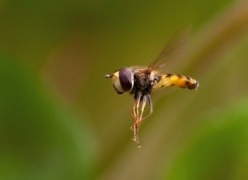
I was pleased the other day to capture this little hoverfly in mid hover with the light captured in its wings.  However, the original shot wasn’t quite as nice.

The background is my patio.  It is smooth and doesn’t distract the eye away from the subject but it is not very pretty.  A lovely smooth green would have been ideal but the hoverfly ignored my polite request that it hover over the lawn.  So I decided to improve the shot with a little photoshop magic.

Homemade texture

I have a growing collection of what I call “garden bokeh” images.  They are easy to make. Just find a pretty flower bed and some dappled light and, using manual focus, twiddle the focus ring until you get something you like.  Then snap.  (I like the soft circles that a wide aperture brings – the above is f3.2 – but if you want harder shapes, go for a narrower aperture.)  After a bit of experimenting, I decided on this pink, white and green shot for my new background.  Then it was an easy matter of copying and pasting the bokeh image onto my original.  I usually experiment with various blend modes.  Depending on the look you are after, you are likely to end up using soft light, overlay, hard light, multiply or screen.  The last two have quite a defined impact: multiply will apply the shadows in the new layer whereas screen will apply the highlights.  The other three overlay all tones but with varying intensity.  In this case, hard light worked best.  If the bokeh had been more contrasty, a softer overlay would probably have been better. Then a small amount of black brushing where the new layer was slightly obscuring the hoverfly and, hey presto!

It’s really no different from using a texture, except the over-layer doesn’t actually have any texture, just soft bubbles of colour.

Is it cheating?  Not at all, in my opinion.  Both images were taken by me and it is no different from double exposing film or choosing a complementary background in a studio.  What do you think?

Boke(h) explained, a bit

Ice and bokeh

A popular monthly photography magazine recently ran a brief article with the header: ‘What does ‘bokeh’ actually mean?’ The magazine’s answer was: ‘Bokeh is the effect that’s created by blurred lights in out-of-focus areas’. This is not strictly correct, although a common misconception. So I thought I might spend today’s post on the subject of boke(h).

Butterfly

The reason for the bracket is that the word, in the original Japanese, has no ‘h’: the ‘h’ is there so that non-Japanese speakers do not pronounce it like broke but without the ‘r’. Here’s how OxfordDictionaries.com defines bokeh: ‘the visual quality of the out-of-focus areas of a photographic image, especially as rendered by a particular lens’. So, bokeh is not just discs of light like those in the images above. It is also the smooth background in the picture below.

20120714-200535.jpg

If you are trying to create bokeh, your results are going to depend on a number of things including your lens. On the whole, good quality prime lenses produce smoother, better quality bokeh. In the picture below, the nine-sided (really, I counted them!) highlights behind the kittiwake are the result of the lens picking up the sparkles in the sea beyond the cliff.

bird in Northumberland

At first sight the bokeh lights make a pretty background. But let’s take a closer look at those nonagons.

Not so nice! That would not make a very pretty print. My 70-300mm zoom lens does not make great bokeh.

On the other hand, my 100mm macro lens, a beautiful little prime, does rather nice, creamy bokeh.

Ah, that’s better.

Also, your choice of aperture will affect bokeh lights. In the shots below, the one on the left is at f2.8 and the one on the right at f5.6.

demonstration of aperture effect on bokeh

Equally, the distance from your focal point will change the bokeh. Below, the aperture is f2.8 in both shots but look at the difference in the bokeh lights when I move closer to the flower in the second shot.

effect of distance on bokeh lights

If you want the science, there is a website that explains it all. Good luck. In the meantime, here are some random thoughts about bokeh. Bokeh is good if you want a nice uncluttered background that does not distract from your subject. Let’s compare two shots of damselflies mating.

damselflies

Wow. I got them in full mating pose here, making a ring. But that background is fussy. It detracts.

mating damselflies

Here, the amorous couple is only in half-hold position, but the background is less distracting. It is a better image because I am communicating to the viewer rather than simply making a record. (Mind you, the camera club judge still complained about the light bit of bokeh top right – you can’t please everyone all of the time!) Of course, you have to balance using an aperture wide enough to throw the background out of focus but not so wide that only part of the subject is sharp. But then no-one said it was going to be easy and that’s all part of the fun.

As for those ubiquitous bokeh lights, I prefer them when they are not distracting, or if they are made to be part of the image, as in the first shot in this post and the not-hugely-brilliant-but-suitably-illustrative shot below.

dandelion seed

One final thought. Bokeh is not limited to backgrounds. The shot below exploits the impact of out-of-focus areas in front of the focal point.

web and refraction

It can be effective deliberately to focus past objects to add a soft, dreamy look,

pyracantha blossom

or the feeling of having just happened upon the subject, by peeping through the undergrowth.

crocus

That’s enough bokeh from me. Do you have a favourite bokeh shot or tip? Perhaps you find the term slightly irritating, or is that just me? Feel free to share in the comments.

Macro economics

20120520-120158.jpg

I have found that people often assume that they will not be able to do macro photography without expensive kit. Certainly, I now enjoy using Canon’s 100mm L IS macro lens on the full-frame 5Dii, hardly inexpensive equipment. However, looking back through my macro shots I was surprised how many, fairly decent, images I had achieved before I bought my current kit.

20120520-120639.jpg

Most of the shots in today’s post were taken using my 400D, a fairly old, entry-level DSLR with only 10mpx at its disposal. All of them, except the last one, were taken using the Sigma 50mm f2.8 EX DG Macro, a nice little lens that you can pick up for £250 or less.

20120520-120910.jpg

True macro lenses have a fixed focal length. They are prime lenses and, therefore, usually produce higher image quality than a zoom.

20120520-121051.jpg

A 50mm prime has many uses beyond macro. 50mm is a nice length for portraits, for example. So your macro lens is a good and versatile purchase.

20120520-121234.jpg

I recently read in a photography magazine that anything less than 100mm was too short for shooting insects. Hopefully, this post proves otherwise.

20120520-121440.jpg

Another item often touted as essential for macro work is an expensive flash, usually a ring flash for insects. Not so. All of my macro work is done in natural light.

20120520-121615.jpg

If you are not yet ready to buy a macro lens, there are other options. Extension rings, dioptres, or reverse mounting a regular lens, all achieve good image magnification although handling them well takes some practice.

20120520-121913.jpg

Finally, do not assume that without dedicated macro equipment, close-up work is out of reach. This final shot was taken using a 24-105mm zoom lens.

20120520-122159.jpg

Outdoor macro photography is my favourite genre. You can do it at almost any time of day and it is best when the sun is not shining. Perfect for those of us who live in a country the sun has forgotten and whose other commitments prevent them spending hours waiting for the light at sunset and sunrise.
Are you already a macro fan, or are you thinking of taking it up?

Forgotten skills?

20120509-105620.jpg

I am a member of a camera club and often enter images in their competitions. One night I entered this image, called “Floral Fireworks”. It did very well, earning me 10 out of 10. The judge was complimentary but she assumed the blurring had been achieved in Photoshop. In fact, this shot was, apart from a small crop and the frame, straight out of camera. The blur is simply the result of using a wide aperture (f2.8) and focusing on the centre of a cup shaped bloom. The petals, being nearer the sensor than the centre, are soft.
I think Photoshop is a powerful and effective tool and I enjoy using it. But I wonder whether it has caused us sometimes to forget what can be achieved in camera? For me, the most powerful tool of all is understanding how my camera works. What do you think?

Lightbox fun

20120429-105926.jpg

Today the weather is truly dreadful. Cold, relentless rain and high winds. While, for photographers, there is no such thing as bad weather, some delicate souls (me!) might be tempted to stay firmly indoors. But that doesn’t mean the photography has to stop. The top image was taken in my kitchen using a lightbox. My A4 lightbox set me back £50 but has been worth every penny. It works best for semi-transparent subjects where the backlighting of the lightbox reveals internal details that might otherwise go unnoticed.

20120429-110530.jpg

Some tips:
– lightboxes can take a while to warm up and reach maximum brightness. You can use that time to make your arrangement.
– the bright light may fool the camera into underexposing so dial in some exposure compensation.
– if your subject is wet, use a sheet of clear acetate to protect the lightbox. This also makes it easier for you to move the arrangement round to find the best composition.
– for an arrangement like the one at the top here, try to select as small an aperture as you can to get maximum sharpness from corner to corner. Using a tripod will help. As will making sure your lens is parallel to the arrangement.
– don’t be afraid to experiment with your processing. Inverting the image can produce some weird and eye-catching results. In the shots below, a physalis fruit became an alien pod and a sea thistle exploded!

20120429-111359.jpg

20120429-111414.jpg

In flight entertainment

20120425-094552.jpg

One of my photographic obsessions in the last couple of years has been capturing insects in flight. Particularly bees and hover flies. I have by no means mastered this art yet. But I have bagged a few shots that I like and I have learned a few things along the way.

20120425-094844.jpg

I suspect that the best way to get really superb shots is to find a flower that the insects frequent, set up the tripod, lock focus on the flower and use a remote shutter release to fire off a load of shots every time a bug comes near. I can see the attraction of this laid back approach. I imagine a deck chair, comfy cushions, a cool glass of Pimms… But you would need that kind of still summer’s day that only happens in this country in Evelyn Waugh novels. Even the slightest breeze can move a flower. So, ditch the tripod.

20120425-095550.jpg

I prefer to shoot flying bugs in shutter priority, set to 1/640 or 1/800, with the camera set to AI servo and continuous shooting. Any faster than 800 and you risk freezing the wings. I prefer blurry wings. They’re moving, and I want my picture to show that. Compare the two shots below:

20120425-095804.jpg

20120425-095840.jpg

The first shot is probably better quality but I prefer the shimmering wings in the second.

While blurry wings are good, blurry bodies are not, especially eyes. I use centre spot focus; my manual focus skills just aren’t up to the job. If yours are, go for it. For those of us who rely on auto, you should aim to get the centre point over the eye. Yes, it’s tricky. But put in some practice and you will be able to do it. Softness in the rest of the insect matters less if the eyes are clear.

20120425-100310.jpg

I won’t use flash; I don’t want to ‘bug’ the bugs. So having such a fast shutter speed reduces my depth of field somewhat, or a lot! Therefore, I always use ISO 400 for these shots. That gets me more depth. Really bright direct sunlight that would allow a lower ISO is usually fairly ugly light anyway. On the upside, a wider aperture means nicer backgrounds, smooth and undistracting.

Background is half the battle. Compare the next two shots. In the first the bee is nice and sharp but the background is ugly. In the second, the bee is frankly too soft but you just have to love that fresh green background. Which do you think is the more pleasing image?

20120425-100904.jpg

20120425-100924.jpg

Oh, and I mustn’t forget to mention metering. I use spot metering. I want to expose for the bug and it is too small in the frame for the camera to expose for it in the default, evaluative metering mode.

20120425-101756.jpg

Finally, it helps to learn a bit about the habits of your models. After a while of crouching in the bushes with ants crawling up your trousers you will start to notice that, while honey bees tend to approach flowers in a business-like straight line, bumble bees live up to their name and bumble all over the place. Certain hover flies, particularly the marmalade fly, hover beautifully, while others zoom around oblivious to the fact that they are supposed to be hover flies and are frankly not worth your trouble until they settle.

20120425-102338.jpg

Finally, be prepared to get very funny looks from a lot of people if attempting any of this in public. Good luck!

20120425-102513.jpg

Many thanks to The Goat that Wrote for the idea for today’s post.

PS Before someone asks, I use a 100mm macro lens on a full frame camera. But you could do this just as well with a cropped sensor and another lens.
And, no, I have never been stung.

PPS I have shown some of the images in small size because of problems with downloading really long blog entries.  All of the images stand up to scrutiny at a larger size.  You’re just going  to have to trust me on that 😉

The pleasure in making do

20120415-122139.jpg

Photographers can spend a great deal of money on equipment, especially if they want to shoot indoors, studio-style. This image is one of my most successful. It has won me several awards and has been accepted into juried exhibitions. Recently it was one of only seven images from Surrey accepted into the Photographic Alliance of Great Britain’s annual projected digital image exhibition. Judges often comment favourably on the fine control of lighting in this photograph. Yet this shot was taken in natural daylight in front of a black lever arch file with a piece of white paper as a reflector. I used my canon 400D and its kit lens, now considered by most to be outdated and barely adequate equipment. The tripod is more than fifty years old and was passed on to me by my father. A picture of my totally Heath Robinson setup (and very messy kitchen) is below. Who needs a posh studio? There is pleasure in making do.

20120415-122800.jpg

The secret world of small things

20120411-095036.jpg

Rose explorer (a tiny bee explores a rose in my garden)

Macro is one of my favourite modes of photography, particularly when the subject is mini-beasts. Perhaps with this subject more than any other, photography has revealed to me a secret world. I try to find points of view that create the impression of seeing the macro landscape as an insect might. My subjects are photographed in natural light, as I find them. I will never move them or otherwise deliberately interfere in their behaviour. I certainly will not immobilise them by putting them in the fridge as many photographers do! If they fly/crawl away before I get my shot, then so be it; it’s part of the challenge. I prefer to show insects interacting with their environment rather than zooming in really close for a ‘scientific’ style of shot.
My family find it strange that I photograph bugs as I used to be afraid of them. Could another benefit of photography be phobia busting? (But I am still afraid of spiders – don’t tell!)